
A professional car wrap can completely transform a vehicle’s appearance, protect its original paint, and turn it into a mobile marketing asset. Whether you’re wrapping a company car for brand visibility or customizing a personal vehicle, reviewing fleet graphics installation examples and understanding the professional installation process ensures you get a result that looks flawless and lasts for years. As a 3M Preferred Installer, AP Installations has wrapped thousands of vehicles across the country. In this guide, we’ll walk you through every step of a professional car wrap installation. Ready to get started on your project? Contact our team at (503) 924-6168 for a free consultation.
Key Takeaways
- Surface preparation is everything: A professional car wrap begins long before the vinyl touches the vehicle. Thorough cleaning, decontamination, and surface inspection account for roughly 40% of the total installation time and are the single biggest factor in wrap longevity.
- Material quality and certification matter: Using premium cast vinyl from manufacturers like 3M or Avery Dennison, applied by a certified installer, is the difference between a wrap that lasts 5–7 years and one that fails in months.
- Post-heat and aftercare seal the deal: The final post-heating step locks the vinyl’s memory in place, preventing lifting and shrinkage. Combined with proper aftercare, this ensures your investment stays vibrant and intact.
What Is a Professional Car Wrap?
A professional car wrap is the application of a high-quality vinyl film over a vehicle’s painted surfaces. Unlike a DIY approach, professional installation uses specialized tools, controlled environments, and trained technicians to achieve a seamless, paint-like finish. The vinyl conforms to every curve, crease, and body line of the car, creating a second skin that can display custom graphics, brand messaging, or a complete color change.
Professional-grade wraps use cast vinyl film, which is manufactured to be thin, conformable, and durable. This is distinctly different from calendered vinyl, which is thicker, less flexible, and prone to shrinking over time. When applied correctly by a certified installer, a cast vinyl wrap protects the original paint from UV rays, minor abrasions, and road debris while delivering a stunning visual result. AP Installations uses 3M and other premium materials for every project, ensuring each custom vehicle wrap meets the highest standards.
What Tools and Materials Do Professionals Use?
The quality of a car wrap depends heavily on using the right tools. Here is a breakdown of the essential equipment that professional installers rely on for every job:
Vinyl Film Selection
Premium cast vinyl from 3M, Avery Dennison, or KPMF is the industry standard. Cast films are typically 2–4 mils thick and feature air-release adhesive channels that allow bubbles to be squeegeed out easily. These films conform to complex curves without excessive stretching and resist shrinking for 5–7 years.
Application Tools
- Felt-edge squeegees: The primary tool for pressing vinyl onto surfaces. The felt tip prevents scratching while providing firm, even pressure.
- Heat gun: Used to soften vinyl for stretching around curves, recesses, and edges. Temperature control is critical; too much heat damages the film.
- Infrared thermometer: Monitors surface temperature to prevent overheating during application and post-heating.
- Precision cutting tools: Knifeless tape and precision blades allow clean cuts without scoring the paint underneath.
- Isopropyl alcohol (IPA): A 70% IPA solution is used to clean surfaces and tack edges for a stronger bond.
- Clay bar kit: Removes embedded contaminants that washing alone cannot eliminate.
Workspace Requirements
Professional installers work in temperature-controlled environments, typically between 60°F and 80°F. The space must be clean, well-lit, and free from dust and debris. A dirty or cold workspace is one of the most common causes of wrap failure, which is why professional shops invest heavily in their facilities.
How Do You Prepare a Car for Wrapping?
Surface preparation is the most critical phase of a professional car wrap. Experienced installers spend 30–40% of their total project time on prep work because even a tiny speck of dust or residue trapped under the vinyl creates a visible imperfection. Here is the step-by-step process:
Step 1: Deep Wash and Decontamination
The car receives a thorough hand wash using automotive soap to remove surface dirt. This is followed by a clay bar treatment across every panel to pull out embedded contaminants like tree sap, tar, industrial fallout, and brake dust. These microscopic particles create bumps under vinyl that are impossible to fix after application.
Step 2: Surface Inspection and Repair
Every panel is inspected for chips, dents, rust spots, and paint defects. Vinyl conforms to whatever is underneath it, so any imperfection in the paint telegraphs through the wrap. Minor chips may need touch-up paint, and dents should be repaired with paintless dent removal (PDR) before installation begins.
Step 3: Disassembly of Trim and Hardware
Professional installers remove door handles, mirrors, badges, antenna covers, and trim pieces where possible. Wrapping around these components leads to lifted edges and premature failure. Removal allows the vinyl to tuck cleanly into gaps and creates a factory-finish appearance.
Step 4: Final Wipe-Down with IPA
Every surface that will receive vinyl gets a final wipe with isopropyl alcohol. This removes any remaining oils, wax, or silicone residue that would compromise adhesion. Special attention goes to edges, seams, and recessed areas where contaminants tend to accumulate.

What Is the Step-by-Step Car Wrap Installation Process?
With the vehicle fully prepped, the actual vinyl application begins. This is where technique, experience, and patience converge to produce a professional result. The process typically takes 1–3 days for a full car wrap depending on the vehicle’s complexity and the design.
Step 1: Measure and Cut Panels
The vinyl is measured against each body panel and cut with 4–6 inches of extra material on every side. This overage provides grip for the installer and ensures full coverage around edges. For printed wraps with specific graphics, alignment marks are used to ensure design continuity across panels.
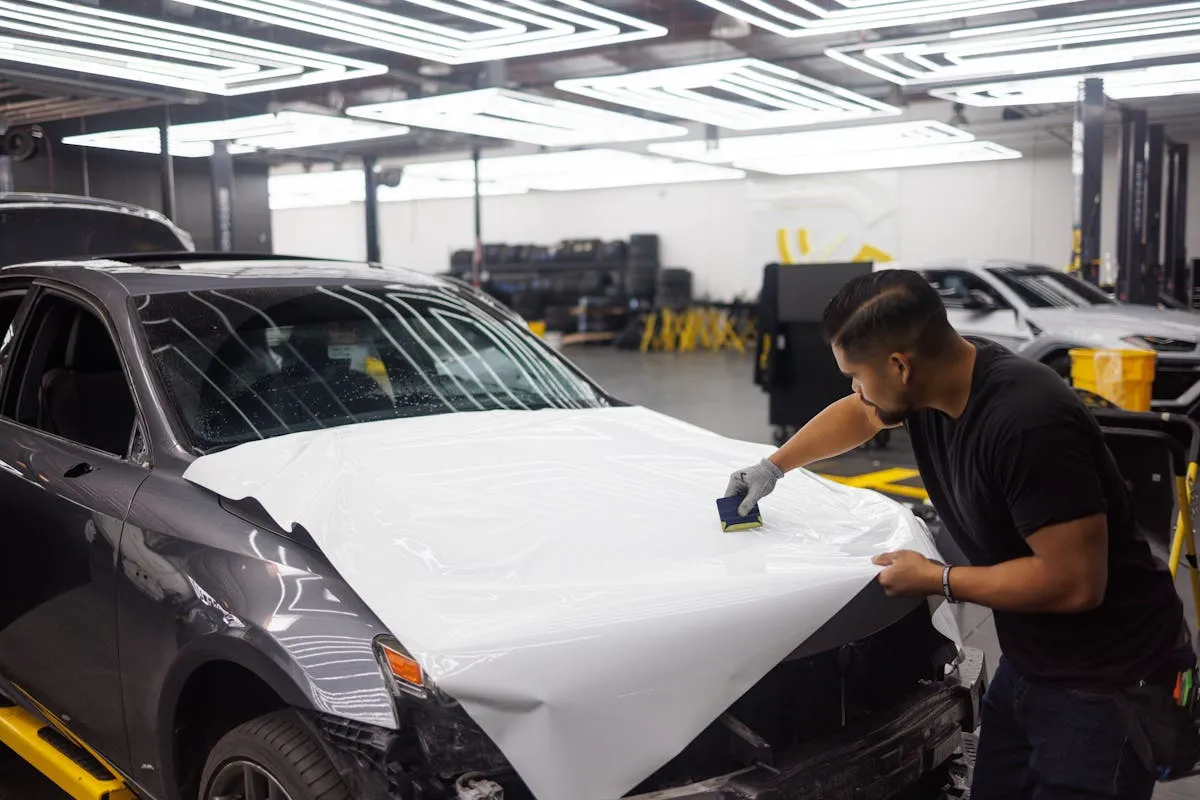
Step 2: Position and Tack the Vinyl
The backing paper is removed, and the vinyl is held above the panel with even tension. The installer “floats” the vinyl over the surface, touching down in the center first. This center-first approach prevents air from getting trapped between the film and the paint.
Step 3: Squeegee from Center to Edges
Using firm, overlapping strokes, the installer pushes air out from the center toward the edges with a felt-edge squeegee. Each stroke overlaps the previous one by about 50% to prevent trapped air channels. The pressure must be consistent; too light leaves bubbles, too heavy stretches the film unevenly.
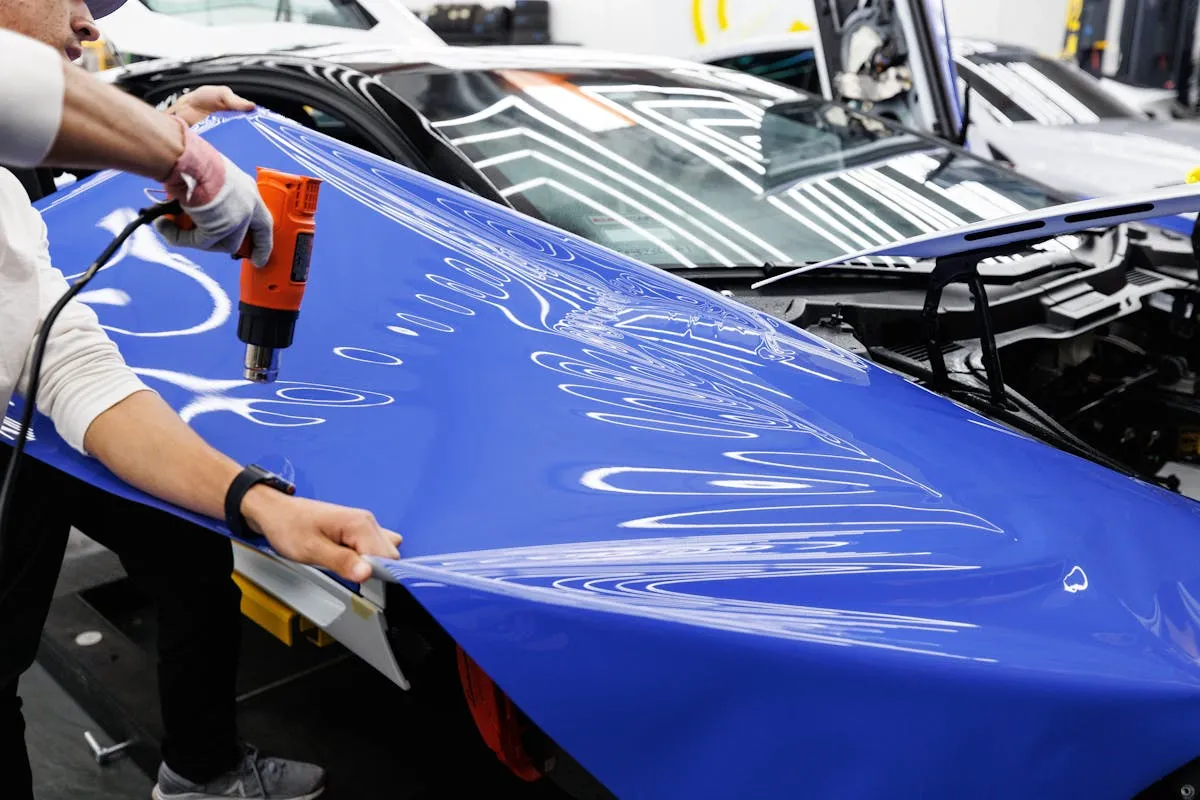
Step 4: Heat and Stretch Around Curves
Complex body lines, bumpers, mirrors, and recessed areas require heat. The installer uses a heat gun to warm the vinyl to approximately 180°F–200°F, making it pliable enough to stretch and conform to compound curves. An infrared thermometer monitors the temperature to prevent overheating, which can thin the vinyl and cause premature failure.
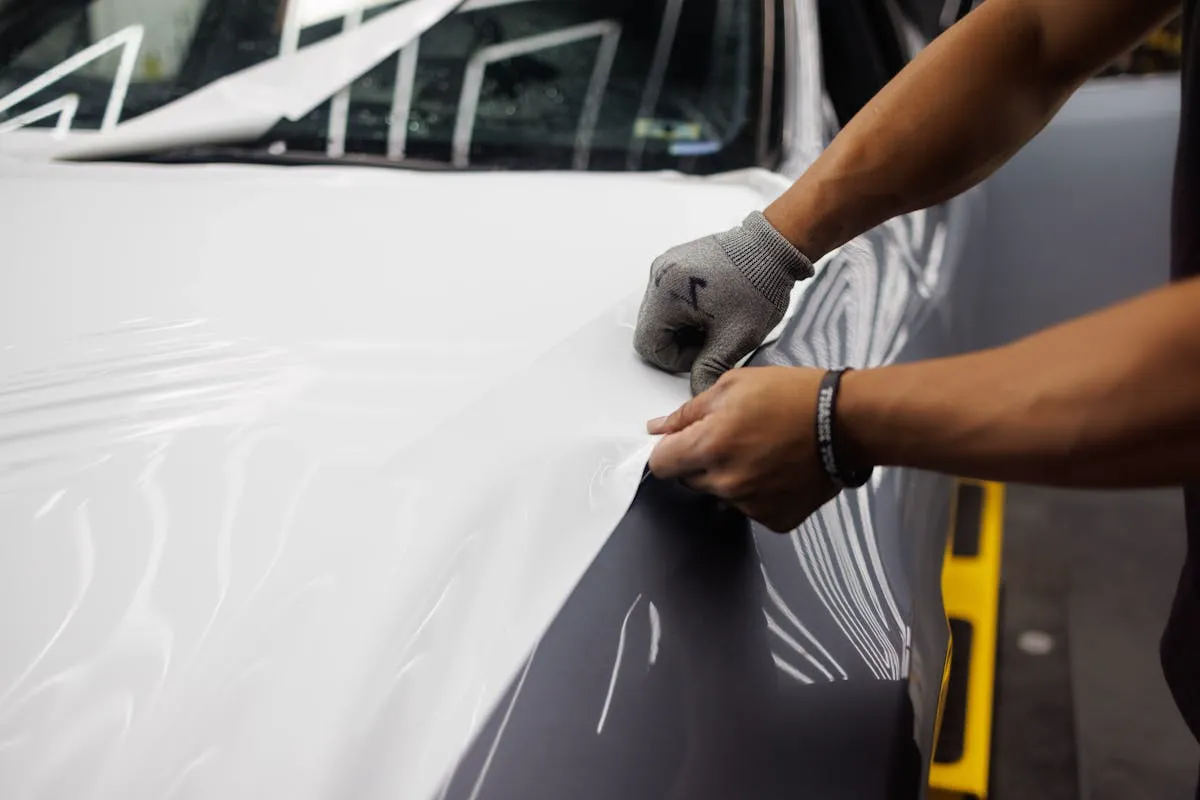
Step 5: Trim Excess Material
Once the vinyl is fully adhered, excess material is trimmed using knifeless tape or a precision blade. Knifeless tape is preferred because it creates a clean cut line without any risk of blade marks on the paint. The edges are then tucked into body gaps, under trim, and around seams for a seamless finish.
Step 6: Post-Heat the Entire Vehicle
This is the step that separates professional installations from amateur ones. After all panels are complete, the entire vehicle is post-heated. The installer passes a heat gun over every square inch of vinyl, raising its temperature to activate the adhesive’s memory. This step locks the vinyl into its stretched position and prevents it from lifting, shrinking, or pulling away from edges over time. It’s particularly critical on curves, bumper wraps, and any area where the vinyl was stretched more than 10%.
The professional installation process is similar across vehicle types. If you’re curious about the process for larger vehicles, our truck wrap installation guide covers the unique considerations for commercial trucks and vans.
How Long Does a Professional Car Wrap Last?
A professionally installed car wrap using premium cast vinyl typically lasts 5–7 years. Several factors influence this lifespan:
- Material quality: Cast vinyl (3M 1080/2080, Avery Supreme Wrapping Film) significantly outlasts calendered alternatives.
- Installation quality: Proper post-heating, edge sealing, and tension control prevent premature failure.
- Environmental exposure: Vehicles parked outdoors in harsh sun, extreme heat, or coastal salt air will see shorter wrap life.
- Maintenance routine: Regular hand washing and avoiding automated car washes with brushes extends the wrap’s appearance and adhesion.
The cost of a vehicle wrap is a fraction of a custom paint job and includes the added benefit of paint protection. When you factor in the marketing impressions a branded car wrap generates daily, the ROI is substantial.
How Should You Care for a Wrapped Car?
Proper aftercare is essential to maximize the life and appearance of your car wrap. Here are the guidelines that professional installers recommend:
The First 72 Hours
Allow the adhesive to fully cure for at least 72 hours after installation. During this period, avoid washing the vehicle, driving at highway speeds for extended periods, or exposing it to rain if possible. The curing process allows the adhesive to reach full bond strength.
Ongoing Maintenance
- Hand wash only: Use a mild automotive soap and a soft sponge or microfiber cloth. Avoid abrasive scrubbers.
- Skip the automatic car wash: Brushes and high-pressure nozzles at automated washes can lift edges and damage the vinyl.
- Remove contaminants quickly: Bird droppings, tree sap, and bug splatter should be cleaned off promptly as they can stain or etch the vinyl surface.
- Park in shade when possible: Prolonged UV exposure is the primary cause of vinyl fading and degradation. Garage parking or shaded spots significantly extend wrap life.
- Use a vinyl-safe protectant: Spray-on protectants designed for vinyl wraps add a UV-blocking layer and help maintain the finish’s sheen.
Why Hire a Certified Professional Installer?
Car wrapping may look straightforward in time-lapse videos, but the reality involves years of training and thousands of hours of practice. Here is why certification and experience matter:
- Warranty protection: Manufacturers like 3M and Avery Dennison offer product warranties, but only when the wrap is installed by a certified professional. A DIY or uncertified installation voids this coverage.
- Paint-safe removal: A certified installer knows how to apply vinyl so it can be cleanly removed years later without damaging the original paint. Improper application often results in adhesive residue or paint pull during removal.
- Complex surface expertise: Every vehicle has unique body lines, compound curves, and challenging areas. Certified installers train specifically on these problem areas and know how to handle them without overstretching or misaligning the film.
- Material efficiency: Professionals minimize vinyl waste through precise measuring and planning, which helps control project costs.
As a 3M Preferred Installer, AP Installations brings certified expertise to every car wrap project. Our team handles everything from fleet graphics and fleet wraps to individual vehicle color changes and custom designs. We serve clients across the Pacific Northwest and nationwide.
Frequently Asked Questions About Car Wrapping
How much does it cost to professionally wrap a car?
A full professional car wrap typically costs between $2,500 and $6,000 depending on the vehicle size, design complexity, and material choice. Partial wraps and color-change wraps may fall at the lower end, while complex branded designs with printed graphics cost more. The investment includes surface preparation, premium materials, certified installation labor, and post-heat finishing.
Can you wrap a car with existing paint damage?
Minor chips and scratches can be wrapped over, but they may telegraph through the vinyl. Significant paint damage, rust, or peeling clear coat should be repaired before wrapping. Vinyl adheres best to smooth, intact surfaces. A professional installer will assess your paint condition during the initial consultation and recommend any necessary repairs.
How long does a professional car wrap installation take?
A full car wrap installation typically takes 2–5 days. This includes 1–2 days of surface preparation and disassembly, 1–2 days of vinyl application, and a final day for post-heating, reassembly, and quality inspection. Complex designs, custom graphics, or vehicles with challenging body lines may extend the timeline.
Does wrapping a car damage the paint?
No. When installed and removed correctly by a certified professional, a vinyl wrap actually protects the paint underneath. Premium cast vinyl uses repositionable adhesive that releases cleanly. Problems only arise from improper installation, using low-quality materials, or leaving a wrap on well past its intended lifespan (10+ years).
What is the difference between a car wrap and a paint protection film (PPF)?
A car wrap is a colored or printed vinyl designed to change a vehicle’s appearance. Paint protection film (PPF) is a clear, thicker urethane film designed purely to protect the paint from rock chips and scratches. They serve different purposes but can be used together; some vehicle owners apply PPF to high-impact areas like the hood and bumper, then wrap the rest.
Get Your Car Wrapped by Certified Professionals
A professional car wrap is one of the most impactful upgrades you can make to a vehicle, whether for branding, style, or paint protection. The difference between a wrap that turns heads and one that peels in six months comes down to material quality, installation expertise, and proper aftercare.
AP Installations is a 3M Preferred Installer with a team of certified technicians who handle car wraps, custom business vehicle wrap designs, and large-scale fleet graphics installations nationwide. Whether you need a single car wrapped or an entire fleet branded, we deliver the quality and durability your investment deserves.
Ready to start your car wrap project? Contact AP Installations today or call us at (503) 924-6168 for a free consultation.