A blank wall in your office or retail space is a canvas of opportunity. A custom wall mural can transform that space, telling your brand’s story and creating an unforgettable first impression. While the idea of a DIY project can be tempting, a professional wall mural installation is about more than just sticking a graphic to a surface. For a business, every detail matters. A crooked panel, a stray air bubble, or a peeling corner can detract from the professional image you work so hard to maintain. This guide walks through the essential steps for a flawless finish, highlighting the techniques and precision required to ensure your investment looks incredible and reflects the quality of your brand.
Key Takeaways
- Proper Wall Prep is Non-Negotiable: A smooth, clean, and primed surface is the foundation for a professional-looking mural. Taking the time to fill holes, sand patches, and clean the wall prevents peeling and ensures the adhesive bonds correctly for a long-lasting finish.
- Work Methodically to Avoid Mistakes: Rushing leads to bubbles and misalignment. Use a level for your first panel, smooth from the center outwards to push out air, and always use a sharp blade for trimming to get those crisp, clean edges.
- Recognize When to Call a Professional: For a business, a wall mural is a brand statement. If you’re facing a large wall, a complex design, or a tricky surface, hiring a certified installer guarantees a flawless result that protects your investment and reflects your company’s quality.
Wall Murals vs. Wallpaper: What’s the Difference?
When you’re looking to transform a room, both wall murals and wallpaper are fantastic options. But while they both cover your walls, they function quite differently. Think of wallpaper as a repeating pattern—like stripes, florals, or geometric shapes—that creates a consistent background. A wall mural, on the other hand, is a single, large-scale image or piece of art that acts as a focal point. It doesn’t repeat; it tells a story across one dedicated wall.
This fundamental difference changes everything from the installation process to the final impact on your space. Wallpaper requires meticulous pattern matching from one strip to the next, which can be a real headache. Murals are typically printed in numbered panels that you install in a specific order, much like putting together a puzzle. While this might sound simpler, achieving a seamless, professional finish—especially with large-scale custom wall graphics—requires precision and experience. For a business, a flawless installation is non-negotiable, as it reflects the quality and attention to detail of your brand.
Explore Different Types of Wall Murals
Not all murals are created equal, and the type you choose often depends on how long you want it to last. For temporary applications, like a pop-up shop or a seasonal promotion, “peel and stick” murals are a great choice. They’re designed for easy application and removal without damaging the wall underneath. For a more permanent statement in an office lobby or retail space, you’ll want to consider more durable materials. Many modern murals use a “paste the wall” method, where the adhesive is applied directly to the wall instead of the back of the graphic. This technique makes the installation cleaner and more manageable. Unlike traditional wallpaper, these murals come in pre-cut, numbered panels, which eliminates the challenge of aligning a repeating pattern.
Key Differences to Know
The biggest distinction between a mural and wallpaper comes down to visual impact. Wallpaper provides a beautiful, uniform backdrop, while a mural commands attention as the star of the room. Because it’s a single image, a mural can dramatically alter the feel of a space, making a small room feel larger or an ordinary office feel more creative and inspiring. This is a powerful tool for businesses looking to create a specific ambiance for customers and employees. While wallpaper adds texture and style, a well-executed mural can completely transform a space and become a memorable part of your brand’s identity. The installation also differs; wallpaper’s repeating patterns require careful alignment, whereas a mural’s numbered panels are designed to fit together seamlessly to form one complete picture.
How to Prepare Your Wall for a Mural
A stunning wall mural starts long before the first panel goes up. The secret to a flawless, long-lasting finish is all in the prep work. Taking the time to properly prepare your wall creates the perfect canvas for your design, ensuring it looks professional and stays put for years to come. Think of it as building a strong foundation—without it, even the most beautiful artwork can fall flat. A little effort upfront saves you from potential headaches like peeling, bubbling, or visible imperfections down the line. Let’s walk through the essential steps to get your surface ready for its transformation.
Assess and Clean Your Surface
First, take a close look at your wall. Your goal is a surface that is as smooth and clean as possible. Run your hand over it to feel for any bumps, cracks, or uneven spots. Any imperfections will likely show through the final mural, so it’s important to address them now. You’ll want to fill any holes or cracks with a filler and sand them down until they’re completely flush with the wall. Once the surface is smooth, give it a thorough cleaning with a mild soap and water solution to remove any dust, grease, or grime. A clean wall helps the adhesive bond correctly, giving your mural the best possible start.
Repair and Prime the Wall
After cleaning, let the wall dry completely. Now you can focus on creating the ideal surface for adhesion. If you did any sanding, wipe the wall down with a damp cloth one more time to remove any lingering dust particles. This step is small but crucial for a smooth application. Next, apply a quality primer. While it might seem like an extra step, priming seals the wall and prevents the adhesive from soaking into the drywall. Using a good wallpaper primer is a pro tip that helps the mural stick properly and also makes removal much easier in the future.
Measure and Plan Your Layout
Accurate measurements are your best friend during this process. Carefully measure the height and width of your wall in a few different spots, as walls are rarely perfectly square. It’s a smart practice to order your mural slightly larger than your wall’s actual dimensions to give yourself a little extra material to work with. Before you begin, lay out the panels on the floor in the correct order to visualize the final design. If your wall has a unique feature like a window or a fireplace, you might want to start your installation in the middle and work your way out to ensure the design is perfectly centered.
Gather Your Tools and Materials
Before you unroll that first panel, let’s talk about prep. A successful mural installation depends on having the right gear on hand from the start. Gathering your tools and materials ahead of time prevents mid-project headaches and helps the entire process run smoothly. Think of it as setting the stage for a flawless performance. If sourcing everything feels like a project in itself, our team can always handle the entire process for you.
Your Must-Have Installation Tools
To get that crisp, professional finish, you’ll need the right equipment. Your toolkit is your best friend here, making every step from measuring to smoothing much more precise.
Here’s a list of the essentials:
- A sturdy step ladder
- Tape measure and pencil
- A level or plumb line
- A sharp utility knife with extra blades
- Wallpaper smoother or squeegee
- A clean bucket and sponge
- Paint roller, tray, and brush for adhesive
These tools are the foundation of a great installation, ensuring your mural goes up straight and smooth.
Choosing the Right Adhesives
The adhesive you use can make or break your mural. The right choice depends on your mural’s material—some are peel-and-stick, while others require a specific wallpaper paste. If you’re using a paste, mix it carefully according to the instructions to prevent lumps. When you’re ready to apply it, use a roller to spread a thin, even coat on the wall. Be sure to cover an area slightly wider than the panel you’re about to hang. This simple step ensures the edges adhere securely and won’t peel up over time.
Set the Right Room Conditions
Your wall is the canvas, and it needs to be in prime condition. A clean, smooth, and dry surface is non-negotiable for proper adhesion and a seamless look. Start by washing the wall to remove any dust or grease. Next, fill any holes or cracks with drywall filler, then sand the patches until they’re completely smooth. This prep work is the secret behind the stunning, long-lasting vinyl graphic solutions you see in professional spaces. A perfect surface ensures your mural looks incredible for years.
Your Step-by-Step Mural Installation Guide
Okay, you’ve prepped your wall and gathered your tools. Now for the exciting part: bringing your mural to life. Installing a large-scale graphic can feel intimidating, but breaking it down into manageable steps makes all the difference. The key is to work patiently and methodically. Rushing the process is the fastest way to get wrinkles, bubbles, or a crooked final product. While a DIY approach can be rewarding, complex projects often benefit from professional expertise. For a flawless finish on your business’s walls, consider our wall graphic solutions. If you’re tackling it yourself, follow these steps carefully for a stunning feature wall.
Create a Level Guideline
Before a single piece of your mural touches the wall, you need a perfectly straight line to guide you. Don’t trust your eye or the corner of the wall—they’re rarely perfectly plumb. Instead, grab a spirit level and a pencil. Starting from the corner where you’ll place your first panel, measure out slightly less than the panel’s width and make a mark. Then, use your level to draw a straight vertical line from the ceiling down. This plumb line is your north star for the entire project, ensuring that your first panel goes on straight and every subsequent panel follows suit. This simple step is the secret to avoiding a crooked mural.
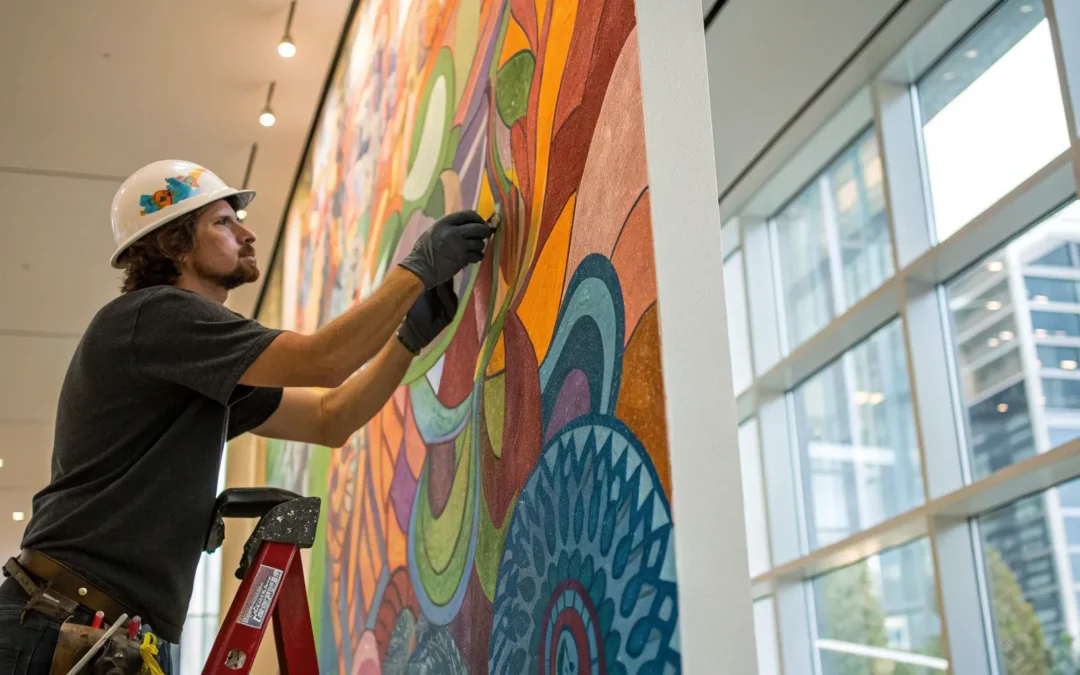
Apply the First Panel
With your guideline in place, you’re ready to hang the first panel. Begin at the top of the wall, carefully peeling back the top portion of the backing paper. Align the edge of the panel with the vertical line you drew, leaving about two inches of excess material at the top to trim later. Once it’s positioned correctly, press the exposed adhesive to the wall. Slowly pull down the backing paper while using a squeegee or wallpaper brush to smooth the panel from the center outwards. This sweeping motion is crucial for pushing out air bubbles as you go, creating a smooth, secure bond with the wall.
Align and Overlap the Next Panels
Most murals are printed with a slight overlap—usually about one or two inches—to create a seamless final image. When you’re ready to hang the second panel, don’t try to line it up edge-to-edge with the first one. Instead, position it so it overlaps the edge of the first panel, carefully matching the pattern of the design. This overlap is an intentional part of the design, and getting it right is what makes the seams disappear. Take your time with this step; proper panel alignment is what separates an amateur job from a professional one. Smooth this panel down just as you did the first.
Smooth Out Bubbles and Trim the Edges
Once all the panels are on the wall, do a final pass with your squeegee or brush to work out any remaining air bubbles. Now it’s time for the finishing touches that create those crisp, clean edges. Using a straightedge or a ruler and a very sharp utility knife, carefully trim the excess material along the ceiling, baseboards, and corners. A sharp blade is essential here to avoid tearing or snagging the vinyl. Taking the time to trim the edges neatly gives your mural a polished, fully integrated look. Stand back and admire your work.
Common Installation Mistakes to Avoid
Even the most carefully planned project can hit a snag. When it comes to installing a wall mural, a few common issues can turn a dream design into a frustrating experience. But don’t worry—knowing what to look for is the first step to getting a flawless finish. From tiny bubbles to crooked panels, these problems are often preventable with a bit of patience and the right technique. Let’s walk through the most frequent installation mistakes and, more importantly, how you can steer clear of them.
Misalignment and Measurement Errors
There’s nothing more frustrating than stepping back to admire your work, only to see that your mural is slightly crooked. The first panel is the most important piece of the puzzle; if it’s not perfectly level, every subsequent panel will be off, too. That’s why you should always measure your wall’s height and width in several spots before you even begin. Walls are rarely perfectly square, so multiple measurements will give you the most accurate picture. For walls with corners or uneven edges, it’s a good idea to add a couple of extra inches to your measurements just to be safe. Taking the time to get this right ensures your finished project looks seamless and professional.
How to Prevent Bubbles and Wrinkles
Bubbles and wrinkles are the tell-tale signs of an amateur installation. They happen when air gets trapped between the mural and the wall, but they are completely avoidable. As you apply each panel, use a soft, clean squeegee or wallpaper brush to smooth the material down. Always work from the center of the panel out toward the edges, gently pushing any air pockets out as you go. If you spot a stubborn wrinkle, don’t try to force it flat. Instead, carefully lift that section of the mural off the wall and reapply it, smoothing it down again. Patience is your best friend here—a slow and steady application is the key to a perfectly smooth surface.
Solving Common Adhesive Problems
For your mural’s adhesive to work correctly, it needs a clean, smooth, and dry surface. One of the biggest mistakes is failing to prepare the wall properly. Any dust, grease, or grime will prevent the vinyl from sticking securely. Before you start, make sure to fill any holes or cracks with spackle and sand them down until they’re completely smooth. Another common issue arises during the final trim. Using a dull blade can tear or snag the vinyl, leaving you with a jagged, unprofessional edge. Always start with a fresh, sharp blade and change it often for the cleanest possible cuts. If you’re unsure about your wall’s condition, it’s always best to contact an expert.
Caring for Your New Wall Mural
Your new wall mural is up, and it looks fantastic. Now, you want to keep it that way. The good news is that modern vinyl murals are designed for durability, but a little bit of care will ensure your investment continues to look vibrant and fresh for years. Proper maintenance starts the moment installation is complete. Even with a professional installation, it’s a good practice to know that any adhesive residue should be wiped away immediately with a damp cloth before it has a chance to dry. This simple step prevents any unwanted texture or sheen on the mural’s surface.
Beyond the initial cleanup, ongoing care is simple and doesn’t require much of your time. The key is consistency. Regular light cleaning prevents dust and grime from building up, which can dull the colors and overall impact over time. Think of it like any other surface in your office or retail space—a quick wipe-down now and then makes a huge difference in maintaining a professional appearance. By following a few straightforward tips, you can easily protect your mural from daily wear and tear, accidental scuffs, and environmental factors like sunlight. This small effort will preserve the visual impact of your mural, keeping your space looking exactly as you envisioned.
Simple Cleaning and Care Tips
For routine cleaning, a soft, dry cloth or a duster is your best friend. Gently wipe down the mural every few weeks to remove dust. If you notice any smudges or light dirt, you can use a soft sponge or cloth dampened with a mixture of mild soap and water. Be sure to wring out the sponge well so it’s not dripping wet. Wipe the area gently without scrubbing, then dry it with a clean, soft cloth. It’s crucial to avoid abrasive cleaners, harsh chemicals, or rough scrubbing pads, as these can scratch the vinyl or cause the colors to fade.
How to Protect Your Mural for Years to Come
The biggest long-term threat to your mural’s vibrancy is direct sunlight. Over time, UV rays can cause the colors to fade. If your mural is in a sunny spot, consider installing UV-filtering window films to protect your graphics. The quality of the material also plays a huge role in longevity. We use premium vinyl designed to resist fading and wear, but taking extra precautions always helps. Also, be mindful of physical damage. Try to arrange furniture so that it doesn’t constantly bump or scrape against the mural, which can cause tears or scuffs. A little bit of prevention goes a long way.
Know When to Call a Professional
While tackling a project yourself can be incredibly rewarding, there are times when calling in a professional is the smartest move. For a business, the stakes are higher—your wall mural is a reflection of your brand, and a flawless installation speaks volumes about your attention to detail. A bubbly, crooked graphic, on the other hand, can send the wrong message entirely. Think about the first impression you want to make on clients walking into your space. A professional-grade mural communicates quality and care from the moment they step through the door.
Sometimes, the scale of the project, the complexity of the design, or the texture of the wall surface requires a level of skill that only comes with experience. Knowing when to step back and let an expert handle the job can save you time, money, and a lot of frustration. It’s the difference between a good result and a great one that truly represents the quality of your brand. When you invest in a custom graphic, you’re investing in your business’s image. Ensuring it’s installed perfectly protects that investment and makes sure it has the intended impact for years to come.
Signs Your Project Needs an Expert
If you’re looking at a massive wall, a tricky surface like brick or concrete, or a complex design with precise cutouts, it’s probably time to call an expert. One of the biggest advantages of professional installation is that you don’t have to worry about having the right tools or materials. Pros arrive with everything needed to get the job done right. Speed and efficiency are other key advantages. A job that might take you a full weekend of stress and second-guessing can often be completed in just a few hours by a trained installer, minimizing disruption to your business. Ultimately, professional wall graphic solutions offer expertise and guaranteed quality, ensuring your investment looks perfect from day one.
Why a 3M Certified Installer Matters
Not all installers are created equal. When you see a credential like “3M Preferred Installer,” it’s a mark of excellence. This isn’t just a title; it’s a guarantee of expertise. To earn this, installers go through rigorous hands-on training and testing directly from 3M, the material manufacturer. This expert craftsmanship ensures your installation is done correctly, which can save you time and money in the long run by avoiding costly mistakes or premature failure. A certified pro understands the nuances of the vinyl, the right adhesives for your specific wall type, and the techniques to create a seamless finish that lasts. When your brand’s image is on the line, working with a certified team provides peace of mind that you’re getting the highest quality result.
Related Articles
- Professional Vinyl Installation PNW
- AP Installations Vinyl Work Gallery
- Become a Professional Installer – Premier Installation Services
- About Us – Premier Installation Services
Frequently Asked Questions
Can I install a mural on a textured wall? While the smoothest walls provide the best canvas, installing a mural on a lightly textured surface is sometimes possible. However, it requires the right type of high-tack vinyl and a specific application technique to ensure the graphic adheres properly and doesn’t look bumpy. For anything beyond a very light texture, it’s best to have a professional assess the surface to avoid a disappointing result.
How long can I expect my vinyl mural to last? The lifespan of your mural depends on a few key factors: the quality of the vinyl, the amount of direct sunlight it receives, and how well it was installed. A high-quality, professionally installed mural in an indoor space can look great for many years. Following simple care instructions, like gentle cleaning and avoiding abrasions, will also help preserve its vibrant look.
What’s the most common mistake people make when installing a mural themselves? The biggest and most frequent mistake is rushing the prep work. It’s easy to get excited and want to put the graphic up right away, but skipping the crucial steps of cleaning, smoothing, and priming the wall is the number one cause of problems like peeling, bubbling, and poor adhesion down the road. A perfect installation starts with a perfect surface.
Is it difficult to remove a wall mural later on? Thankfully, modern vinyl murals are designed for much easier removal than old-school wallpaper. When the wall has been properly primed before installation, the mural can typically be peeled off cleanly in large sections without damaging the drywall underneath. This makes it a great option for businesses that may want to update their branding in the future.
Why is hiring a 3M Preferred Installer a better choice than a general contractor? A 3M Preferred Installer has specialized training directly from the people who make the vinyl. They understand the specific properties of the material and the correct techniques to handle it, ensuring a flawless, long-lasting finish that a generalist might not achieve. This expertise is crucial for protecting your investment and making sure your brand is represented perfectly.