Standing out on a busy street is a constant challenge. You’re competing with every other sign, storefront, and distraction for the attention of potential customers. So how do you cut through the noise and make people notice you? The answer might be right in front of you: your windows. By treating them as a strategic asset, you can create a visual landmark that draws people in. Well-designed graphics can communicate what you do and who you are in a single glance. Using large window decals for business is one of the most effective ways to boost your visibility and turn curious passersby into paying customers. Let’s explore how to do it right.
Key Takeaways
- Define Your Window’s Purpose First: Before choosing a decal, decide what you want it to do. Whether you need complete privacy with opaque vinyl, one-way visibility with perforated film, or subtle elegance with a frosted design, your goal should guide your material choice.
- Plan Ahead to Prevent Costly Errors: A little prep work saves a lot of headaches. Get accurate window measurements, check local sign regulations, and ensure your design uses high-resolution vector files to avoid a blurry or ill-fitting final product.
- Invest in a Certified Installer for a Flawless Finish: The final application is just as important as the design. Hiring a professional, especially a 3M Preferred Installer, guarantees a bubble-free, long-lasting result that protects your investment and represents your brand perfectly.
What Are Window Decals (and How Can They Help Your Business)?
Think of your storefront windows as a blank canvas. Window decals are essentially custom-designed graphics, printed on durable vinyl, that you can apply to glass surfaces. They’re a simple yet powerful way to communicate with potential customers before they even step inside. Whether you want to display your logo, share your business hours, or announce a special promotion, these graphics turn your empty windows into a valuable marketing asset.
From bold, colorful murals to elegant frosted designs, the possibilities are endless. The right decal can capture the attention of people passing by, convey your brand’s personality, and make a memorable first impression. It’s about transforming a functional part of your building into a dynamic tool for branding and advertising.
Understanding Decal Materials
At their core, most window decals are made from a high-quality vinyl film. This material is designed to be durable, weather-resistant, and vibrant. The key difference often lies in how they adhere to the glass. Many decals use a light adhesive backing that creates a strong, long-lasting bond, perfect for permanent or semi-permanent displays. Others, often called window clings, use static electricity to stick to the surface, making them easy to apply, reposition, and remove without any residue. The type of material you choose will depend on how long you want your graphic to last and the specific look you’re trying to achieve with your window graphics.
The Benefits for Your Business
Window decals are one of the most cost-effective ways to get your message out there. They work around the clock to increase your brand’s visibility and draw people in. A well-designed decal can instantly make your business look more professional and established, helping you stand out on a busy street. They’re perfect for highlighting sales, new products, or seasonal events, creating a sense of urgency and excitement. Ultimately, these graphics help attract more foot traffic and turn curious passersby into loyal customers. You can see some inspiring examples of how businesses use decals in our project gallery.
Which Type of Window Decal Is Right for You?
Choosing the right window decal comes down to what you want to achieve. Are you looking for total privacy, a bold marketing statement, or just a touch of elegant branding? Each type of vinyl offers a unique combination of visibility, light, and style. Understanding the differences will help you select the perfect material to bring your vision to life, whether you’re outfitting a storefront, an office, or an entire fleet of vehicles. Let’s walk through the most popular options to find the best fit for your business needs.
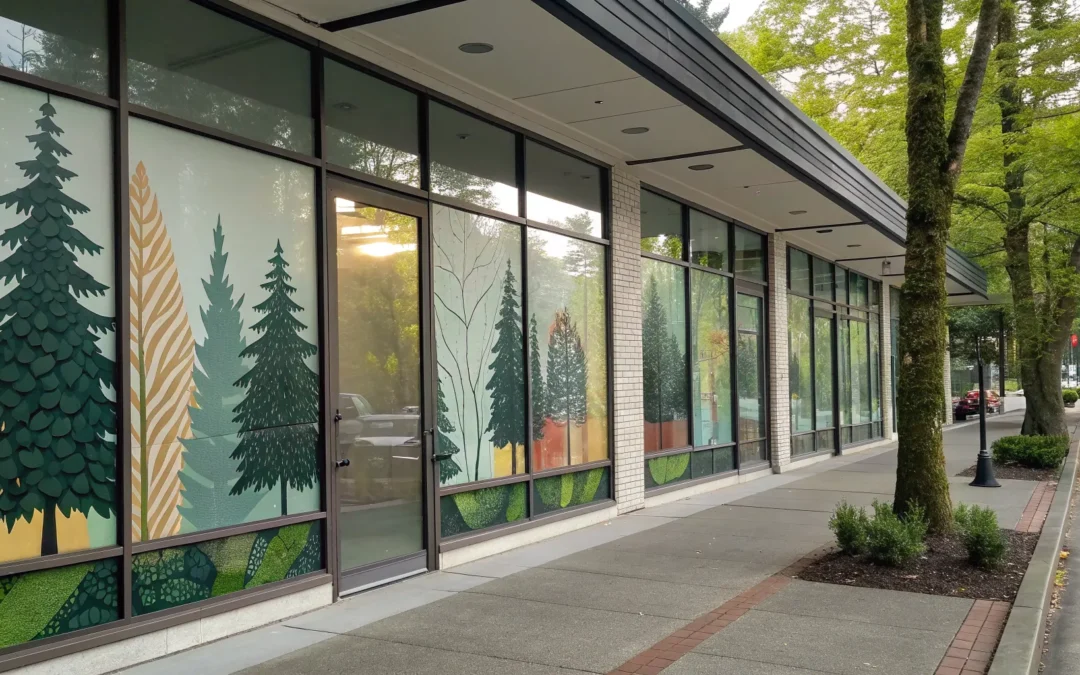
Opaque: For Privacy and Bold Branding
If you want to make a big visual impact while keeping your space completely private, opaque decals are your best bet. These graphics are solid, meaning you can’t see through them from either side. This makes them the perfect canvas for vibrant, full-color designs that grab attention from the street. Think of them as a poster for your window. They’re an excellent choice for businesses like spas, medical offices, or any ground-floor space that needs to shield its interior from view. Opaque decals allow you to use every inch of your window for branding without worrying about what’s happening inside.
Perforated: See Out, Not In
Perforated window decals offer the best of both worlds: branding on the outside and a clear view from the inside. These clever graphics are covered in tiny, uniform holes that allow people inside to see out while outsiders only see your printed design. They also let natural light filter through, so your space stays bright and welcoming. This one-way visibility makes them ideal for storefronts, restaurants, and even fleet graphics, where drivers need to maintain visibility. You can cover an entire window with a stunning advertisement without making your team or customers feel closed in.
Frosted: For an Elegant, Private Look
For a touch of sophistication and privacy, frosted decals are a fantastic choice. They mimic the look of etched or sandblasted glass, creating a soft, blurred effect that obscures the view while still allowing plenty of light to pass through. This option is perfect for creating a sense of privacy in office conference rooms, on glass partitions, or at the entrance to a high-end salon. Frosted vinyl adds a layer of elegance and can be cut into intricate patterns or logos for a custom look that feels both professional and stylish. It’s a subtle way to enhance your space and reinforce your brand’s identity.
Clear: For Simple and Subtle Branding
When you want your branding to be front and center without blocking the view, clear window decals are the way to go. With these decals, your design is printed on a transparent background, so it looks like the graphic is floating on the glass. This is a great solution for displaying your company logo, store hours, or a simple promotional message in a clean, minimalist way. Clear decals are perfect for retail stores that want to maintain an open, inviting atmosphere or for adding simple branding to glass doors. You can see some great examples of how this looks in our past projects.
How to Customize Decals to Match Your Brand
Think of your storefront windows as a blank canvas. With the right design, they can become a powerful tool for communicating your brand’s personality and attracting customers. Customization is what turns a simple piece of vinyl into a strategic marketing asset. It’s about more than just putting your logo on the glass; it’s about creating a cohesive experience that reflects what your business is all about. From the specific shade of blue in your logo to the font you use in your marketing, every detail matters.
When your window graphics align perfectly with your overall brand identity, you create a seamless and professional look that builds trust and recognition. This consistency helps customers immediately connect your physical location with your online presence and other marketing materials. Whether you’re aiming for a bold, attention-grabbing mural or a subtle, elegant design, customizing your decals ensures they work hard for your brand. At AP Installations, we specialize in comprehensive vinyl graphic solutions that bring your unique vision to life, ensuring every color, shape, and line is a perfect match for your brand.
Aligning Colors, Fonts, and Logos
The foundation of a great window decal is its connection to your core brand identity. To create a cohesive look, start with your brand’s style guide. Your decals should use the exact same color codes to ensure the final product perfectly matches your other marketing materials. The same rule applies to typography—stick to your established brand fonts to maintain consistency. When it comes to your logo, always use a high-resolution vector file. This ensures it can be scaled to any size without losing clarity, keeping it sharp and professional whether it’s on a small door decal or a massive window display.
Designing for Maximum Impact
A well-designed window decal does more than just display your logo; it tells a story and grabs the attention of people passing by. Think about what you want to achieve. Are you announcing a sale, sharing your business hours, or simply trying to increase brand awareness? You can use your windows to create a dynamic display with seasonal themes or promotional messages. This approach creates a “drumbeat of messaging” that keeps your storefront fresh and gives customers a reason to look your way. By combining your core branding with timely, eye-catching graphics, you can turn your windows into a highly effective advertising space. Check out some of our past projects for inspiration.
Choosing Custom Shapes and Sizes
Don’t feel confined to a standard rectangle. Custom shapes and sizes offer a fantastic opportunity to make your window graphics truly unique. A decal that is die-cut to the shape of your logo or a specific design element can create a much more dynamic and integrated look than a simple square sticker. You can also play with size to achieve different effects. A small, elegant decal on the door can convey sophistication, while covering an entire window panel can make a bold statement. For larger-than-life displays, multiple decals can be expertly combined to create a single, seamless graphic that transforms your entire storefront.
What to Consider When Planning Your Project
Before you jump into designing your new window graphics, a few key planning steps will save you time and money. A little prep work ensures your project goes smoothly from concept to installation. Think of it as building a strong foundation for your brand’s new look. From getting the right measurements to understanding local rules, here’s what you need to sort out first.
Measuring Your Windows and Assessing the Surface
First things first: you need accurate measurements. Grab a tape measure and carefully note the height and width of the glass area you want to cover. It’s a good idea to measure twice. Also, take a close look at the surface itself. Window decals adhere best to smooth, flat glass. If your windows are textured or heavily curved, it can affect how well the vinyl sticks. Note any obstructions like handles or frames that might interfere with placement. Getting these details right from the start is crucial for a perfect fit and a professional finish for your window graphics.
Checking Local Regulations and Permits
This is a step that’s easy to overlook, but it’s incredibly important. Before you invest in window decals, check your local regulations. Some cities or business districts have specific rules about the size, placement, and even the type of signage allowed. For example, there might be a limit on what percentage of your window can be covered. A quick search on your city’s website or a call to the local planning department can clarify the rules you need to follow to apply for permits. Skipping this step could lead to fines or being forced to remove your new graphics.
Planning Your Budget and Selecting Materials
Window decals are an effective and affordable way to make a big impact, but it’s still important to plan your budget. The total cost will depend on the size of your windows, the complexity of your design, and the material you choose. While it might be tempting to go for the cheapest option, remember that quality materials are a smart investment. High-performance vinyl is designed to withstand the elements—from rainy Pacific Northwest winters to sunny summer days—without fading or peeling. When you request a quote, we can walk you through options to find the best material that fits your vision and budget.
Best Practices for a Flawless Installation
You’ve spent time and resources designing the perfect window decal, and now it’s time for the final, crucial step: installation. This is where your vision truly comes to life. A flawless installation makes your graphics look crisp, professional, and seamlessly integrated with your space. On the other hand, a rushed or improper application can lead to frustrating bubbles, wrinkles, and peeling edges that undermine your brand’s image. It’s the difference between a decal that looks like a high-end, custom feature and one that just looks like a sticker.
Whether you’re a seasoned DIYer or planning to bring in an expert, understanding the best practices is essential for success. Getting this part right not only ensures your decal looks fantastic from day one but also helps it last for years to come. We’ll walk through the most important steps, from meticulously preparing the surface to knowing which tools you can’t live without. We’ll also help you decide when it makes sense to tackle the job yourself versus calling in a professional for that guaranteed perfect finish.
Preparing the Surface Correctly
This is the foundation of a great installation. Any dirt, dust, or residue on the glass will get trapped under your decal, creating bumps and preventing it from adhering properly. Start by cleaning the window thoroughly with a simple solution of soap and water. Use a lint-free cloth to wipe it down and let it dry completely. Just before you apply the decal, lightly mist the window again with a bit of soapy water. This “wet application” method allows you to slide the decal into the perfect position before it fully sticks. Just be careful not to make it too wet, as that can make the process messier and take longer to dry.
Professional vs. DIY Installation
For smaller, simpler decals, a DIY installation can be a great way to save a little money. But as the size and complexity of your graphics increase, so does the difficulty. For very large decals, especially those covering an entire window, it’s smart to consider professional help. An experienced installer has the tools, techniques, and steady hands to ensure a perfect, wrinkle-free application. When you hire a certified team, you’re not just paying for labor; you’re investing in peace of mind and a flawless result that represents your brand beautifully. It eliminates the risk of costly mistakes, like tearing the vinyl or ending up with a crooked design.
Must-Have Tools for a Bubble-Free Finish
If you decide to install the decal yourself, having the right tools makes all the difference. You don’t need a massive toolkit, just a few key items. First, a spray bottle for your soapy water solution is essential for the wet application method. You’ll also need a squeegee or a similar flat-edged tool (a credit card can work in a pinch) to smooth out the decal and push any air bubbles or excess water to the edges. A measuring tape will ensure your placement is perfectly level and centered. Finally, keep a soft, lint-free cloth handy for cleaning the surface and wiping away any drips. These simple tools are your best defense against a bubbly, uneven finish.
How to Make Your Window Decals Last
You’ve invested in beautiful window decals to represent your brand, and you want them to look sharp for as long as possible. While a professional installation is the foundation for longevity, a little bit of care goes a long way. Protecting your graphics from the elements and cleaning them correctly will maximize their lifespan and ensure they continue to make a great first impression. Think of it as simple upkeep that protects your investment and keeps your storefront looking its best. With the right approach, you can keep your decals vibrant and effective for years.
How to Clean Your Decals Safely
Keeping your window decals clean is simple, but it requires the right touch. To maintain their vibrant look, skip the harsh chemicals. Instead, use a soft, non-abrasive cloth (like microfiber) and a gentle, ammonia-free glass cleaner. Why ammonia-free? Cleaners with ammonia can break down the vinyl material and weaken the adhesive over time, leading to peeling or discoloration. Just spray the cleaner onto your cloth, not directly on the decal, and wipe gently. Avoid using pressure washers or abrasive scrubbers, as they can cause the edges to lift or scratch the surface. A little care makes a huge difference in preserving the color and quality of your window graphics.
Protecting Decals from Weather
Here in the Pacific Northwest, we get our fair share of weather. The good news is that high-quality vinyl is built to handle it. When you work with a certified installer, you’re getting materials designed to withstand rain, wind, and most importantly, UV rays from the sun. Sun exposure is the biggest culprit behind fading, so choosing a UV-resistant vinyl is your best defense. While you can’t control the weather, you can choose the right materials from the start. A professional installation ensures your decals are applied correctly to prevent water from seeping underneath, which helps them stay put through every season.
Knowing When It’s Time for a Replacement
Even the highest-quality decals have a lifespan. Generally, you can expect outdoor graphics to last over three years, while indoor ones can look great for more than five. However, it’s best to check on them periodically. Look for clear signs of wear like significant fading, cracking, or peeling edges that can’t be smoothed down. If your branding has changed or the message is outdated, that’s another great reason for an update. Replacing worn-out decals isn’t just about maintenance; it’s an opportunity to refresh your look and showcase something new. When you’re ready for a change, you can explore new project ideas to keep your business looking current.
What Factors Into the Cost of Window Decals?
When you’re ready to invest in window graphics for your business, one of the first questions you’ll have is about the cost. The final price tag isn’t just one number; it’s a combination of several key factors. Understanding what goes into the cost will help you set a realistic budget and make informed decisions that align with your goals. From the type of vinyl you choose to the complexity of the installation, each element plays a role in the total investment. Let’s break down the main components so you know exactly what to expect.
How Material and Size Affect Price
The two most significant factors influencing the cost of your window decals are the material you select and the size of your design. High-quality vinyl is the industry standard for a reason—it’s built to last and can stand up to the Pacific Northwest’s varied weather. Different types of vinyl graphics come at different price points; for example, a vibrant, opaque decal will have a different cost than an elegant frosted one or a complex perforated film.
Naturally, the larger the decal, the more material and ink are required, which increases the price. That’s why getting accurate measurements of your windows is a critical first step before you request a quote. A precise measurement ensures you’re getting a price for exactly what you need.
Factoring in Design and Installation Costs
Beyond the physical materials, you also need to account for the creative and technical work involved. If you have a print-ready design, you can save on creative fees. However, if you need a custom graphic created from scratch, you’ll want to budget for professional design services to ensure your vision comes to life effectively.
Most importantly, professional installation is a cost you shouldn’t overlook. While it might be tempting to try a DIY approach for a small decal, large-scale graphics require an expert touch. A certified professional ensures your decal is applied smoothly, without bubbles or wrinkles, for a flawless finish that lasts. Investing in a 3M Preferred Installer guarantees the job is done right the first time, saving you from costly replacements down the road.
Finding Discounts and Factoring in Shipping
While online printers often advertise discounts and shipping deals, working with a professional installation company involves a different kind of value. Instead of looking for coupon codes, focus on the overall project efficiency. For instance, bundling multiple installations—like your storefront windows, interior wall murals, and fleet vehicles—at the same time can often be more cost-effective than scheduling them separately.
When you receive a quote, it should be a comprehensive overview of all project costs, including materials, labor, and any logistics involved in getting the printed graphics to your location. Don’t hesitate to ask for a detailed breakdown so you can see exactly where your money is going. Comparing quotes based on quality and installer credentials, not just the price, will ensure you get the best long-term value.
How to Find a Professional Window Decal Installer
Your window decal is only as good as its installation. A poor application can lead to bubbles, peeling, and a shortened lifespan for your graphics, undermining your investment. Finding the right professional installer ensures your vision comes to life flawlessly and makes a lasting impression. But with so many options out there, how do you choose the right partner? It comes down to checking their credentials, asking the right questions, and looking beyond the price tag.
Check for Credentials and Certifications (like 3M Preferred)
When you’re looking for an expert, start by checking for professional certifications. These aren’t just fancy badges; they’re proof that an installer has undergone rigorous training and testing. The gold standard in the industry is the 3M Preferred Graphics Installer designation. This means the installer has demonstrated deep knowledge and hands-on skill, meeting the highest standards set by 3M. You can find a list of certified professionals through organizations like the United Application Standards Group (UASG), which helps connect businesses with vetted installers. Choosing a certified professional gives you peace of mind that your project is in capable hands.
Key Questions to Ask a Potential Installer
Before you commit, it’s smart to have a conversation with any potential installer. Think of it as a mini-interview to gauge their expertise and ensure they’re a good fit for your project. Come prepared with a few key questions to get the conversation started. Ask about their specific experience with window decals and request to see a portfolio of their previous work. You should also inquire about the materials they recommend for your windows and why. Most importantly, ask if they are part of the 3M Preferred Installer program. Their answers will reveal their level of experience and commitment to quality.
How to Compare Quotes and Reviews
Once you have a few potential installers in mind, it’s time to compare quotes. While cost is always a factor, avoid making your decision based on price alone. A low bid could signal inexperience or the use of subpar materials. Instead, look for value. A detailed quote should break down the costs for materials, design, and labor. Alongside quotes, dig into reviews and testimonials from past clients. Some directories even let you find a professional installer and read customer feedback in one place. Look for consistent praise regarding their professionalism, communication, and the quality of the final product.
Common (and Costly) Window Decal Mistakes to Avoid
Window decals are a fantastic way to make your storefront work for you, but a few common pitfalls can turn a great idea into a costly problem. Getting the design, installation, and material right from the start saves you time, money, and a lot of frustration down the road. Let’s walk through the most frequent mistakes we see so you can sidestep them completely and ensure your window graphics look amazing for years to come.
Avoiding Common Design Mistakes
Your window decal is only as good as its design. The most common misstep is using low-resolution images. If you start with a fuzzy or pixelated file, the final print will look unprofessional, no matter how great the material is. Always use high-quality, vector graphics for a crisp, clean look. Another trap is creating a cluttered design. While it’s tempting to include a lot of information, a simple, bold message is far more effective at grabbing the attention of people passing by. Remember, less is often more when it comes to effective window display design. A clean, clear graphic ensures your message is understood in a single glance.
Sidestepping Installation and Maintenance Issues
Even the best-designed decal can be ruined by a bad installation. Rushing the process is a recipe for disaster, often leading to frustrating air bubbles, wrinkles, and misalignment. Taking the time to properly prepare the surface and apply the vinyl carefully is non-negotiable. This is where a professional installer makes all the difference. Once your graphic is up, a little care goes a long way. Skipping regular, gentle cleaning can lead to premature wear and tear. A simple wipe-down with mild soap and water will keep your window graphics looking fresh and vibrant, protecting your investment and ensuring they represent your business well for years to come.
Choosing the Right Material for the Job
Not all vinyl is created equal, and choosing the wrong type for your project can be a costly error. Opting for a lower-quality material to save a few dollars upfront often leads to fading, peeling, and a much shorter lifespan, especially in the Pacific Northwest weather. It’s also crucial to consider your local regulations. Some areas have specific rules about signage, and overlooking them could result in fines or being forced to remove your decal. Working with an experienced team, like a 3M Preferred Installer, ensures you get durable, high-quality materials that are right for the job and compliant with local codes, giving you peace of mind.
Related Articles
- Car Window Vinyl Decals: Your Complete Guide
- The Essential Guide to Business Window Graphics
- The Guide to Window Graphics for Business
Frequently Asked Questions
How long can I expect my window decal to last in the Pacific Northwest weather? High-quality vinyl is designed to be durable, and you can generally expect your outdoor window graphics to look great for over three years. We use materials specifically chosen to stand up to the rain and sun we get here in the PNW. Proper installation is key to preventing peeling, and choosing a UV-resistant vinyl will protect your design from fading over time.
Are window decals permanent? What if I need to remove them later? While they are designed for a strong, long-lasting bond, most window decals are not permanent and can be removed. The process typically involves using a little heat to soften the adhesive, allowing you to peel the vinyl off. There might be some residue left behind, but it can usually be cleaned off. This makes decals a great option for both long-term branding and temporary promotions.
I have a huge storefront window. Is it really worth hiring a professional for installation? Absolutely. For large or complex graphics, a professional installer is your best investment. They have the experience and specialized tools to ensure a perfectly smooth, bubble-free finish that’s almost impossible to achieve on a large scale without practice. It saves you the stress and potential cost of ruining the vinyl and guarantees a flawless result that reflects the quality of your brand.
What’s the real difference between a window decal and a window cling? The main difference is how they stick to the glass. A window decal uses a light adhesive backing to create a durable, semi-permanent bond, making it ideal for long-term use. A window cling, on the other hand, uses static electricity to adhere to the surface. This makes clings easy to apply, reposition, and reuse, but they are best suited for short-term or seasonal displays.
I’m not a designer. Can you help me create a graphic that matches my brand? Yes, that’s a core part of what we do. We work with you to ensure your vision comes to life in a way that is perfectly aligned with your existing brand identity. From matching your exact brand colors to using the right fonts and logo files, we can guide the process to create a professional and effective design for your windows.